<<< back to [Home]
1. Fermented White Cabbage Juice
2. Kefir
3. Mutaflor (E.coli Nissle 1917) Yoghurt
4. Kombucha
5. Psyllium and Bentonite Shakes
6. Sole
7. Potassium Broth
8. Herbal Tinctures
9. Sprouting
The photographs on this page may take a while to load as there are a large number. Thank you for your patience!
1. Fermented White Cabbage Juice.

How to make your own probiotics (acidophilus) supplement/drink!
Why buy expensive probiotics supplements when you can make your own at home for a fraction of the cost? Especially when it is also performs a soothing role on your intestinal lining. White cabbage is used to make sauerkraut, but it can also be used to make fermented cabbage juice.
- Buy one whole white cabbage (preferably organic, but not strictly necessary). It should a white cabbage and not a green or red cabbage. In supermarkets and grocery stores, white cabbage is usually labelled as 'white cabbage', even though it may look green in places and not completely 'white'. You may elect to buy two or three cabbages at the same time, and make two/three lots in one go, for convenience. The cabbage should be used immediately (asap) for fermentation - basically the fresher it is, the better. If you buy a surplus of white cabbages, you may elect to store the surplus in the refrigerator. It is of course best to ferment from fresh white cabbage. If your cabbage is cold or taken straight from the fridge, it does not matter. You do not have to allow it reach room temperature. The blending process will soon have it at room temperature anyway. On (small) white cabbage provides 1 litre of juice, enough for approximately 4-5 days. If you buy a very large white cabbage it may well be enough for prepare 1.5 lots (and approximately 1.5 litres of juice). You can always cook and eat/discard any excess cabbage that you do not use. This recipe is for 1 litre of fermented white cabbage juice, using one small to medium sized white cabbage.
- Wash your hands and clean the knife, chopping board, blender and glass bowl (big enough for maybe 2 litres of mixture). You may want to rinse these items quickly with a little filtered water afterwards (avoiding tap water). Pour boiling water over the wooden spoon or better still put it in a pan of boiling water. The idea is to keep these implements more or less 'sterile', and not introduce any harmful bacteria.
- Rinse the cabbage briefly with filtered water. Use cold or room temperature water. You want to avoid using hot water or heat directly on the cabbage throughout this procedure, as heat clearly kills bacteria and you don't want to kill off the L.acidophilus bacteria in the cabbage. It is not recommended to use tap water in any part of this procedure (except for the washing and sterilisation steps). You may elect to rinse your implements, juicer and chopping board with boiling water (e.g. boiling tap water), in which case they should cool down before use.
- Chop off the base of the white cabbage (cutting say 1cm into the cabbage) and discard. If the outer leaf or two leaves of the cabbage are a little withered or dirty, then you may wish to peel these off and discard them (perhaps giving the cabbage another quick rinse with filtered water). All the rest of the white cabbage is usable.
- Chop the white cabbage up into small/medium sized chunks.
- Add approximately half a litre of filtered/mineral water (room temperature or chilled) to the juicer/blender. Add a small amount of roughly chopped cabbage. enough filtered/mineral water
- Juice until smooth!
- The more cabbage you add and juice, the larger the volume becomes and the thicker it becomes. It will keep juicing fine until it reaches a certain thickness, whereupon more cabbage added doesn't move around in the juice column very much and so doesn't get juiced/blended properly. At this point, you can push down the pieces/chunks of cabbage further down into the blender (using a sterile implement), nearer the bottom of the blender/juicer, careful to avoid touching the blades. After a certain thickness however, you will have to add more filtered/mineral water prior to adding more cabbage, as it won't blend otherwise. Continue until you have finished the white cabbage or reached the maximum capacity of the juicer/blender.
- After a blender's/juicer's worth of thick mixture is prepared, empty the contents into the glass bowl. A small to medium sized cabbage should only require about 1.5L or so of blender capacity, and I only uss one blender full for every White Cabbage. Depending on the size of your blender/juicer, it may require 2 lots. If you still have cabbage remaining, then go back to the step where you pour 0.5L of mineral/filtered water into the blender and start slowly adding the rest of the cabbage. When you have used up the rest of the cabbage, and blended it smoothly, empty the contents of this into a second glass bowl.

- Once you have emptied the last blender/juicer's worth of thick juice into the glass bowl, cover the glass bowl with cling film. Try not to have the level of juice/mixture in the bowl too high so it touches the cling film. The mixture will rise ever so slightly during the fermentation stage. It is best to have approximately 1cm or more between the top of the liquid and the clingfilm. Otherwise, if the cling film sags and touches the mixture, you may end up with juice leaking down the sides of the bowl and all over the kitchen surface (the capillary effect - you'll soon figure this out).
- Leave the covered bowl(s) on your kitchen table (or other suitable room temperature location) for 4-5 days until fully fermented. Do not leave in direct sunlight. Do not refrigerate during the fermentation stage, as the bacteria won't reproduce as fast in the cold and it won't ferment properly. It is a good idea to stir the mixture every day after 48 hours (although during the summer I stir it after 24 hours), so that the acidophilus and lactic acid is distributed evenly, preventing the growth of harmful bacteria. When you stir the mixture, make sure you use a sterilised wooden, ceramic or plastic spoon, not a metallic one (sterilise with boiling water briefly). Note the smell when you do so.
- After 4-5 days the mixture should be sour smelling and aromatic. In UK conditions, I have found 4 days is normal. During the summer it may ferment quicker than in the winter (depending on the room temperature round the clock, e.g. nearer 4 days). It is best to stir at least from day 2 onwards, or day days, on a daily basis thereafter, when you stir it, to see how it is doing and how close to fermentation it is. It should smell acidic. If you are unsure, then give the mixture a stir (with sterilised non-metallic spoon as described above) and 're-smell'. The mixture is now ready to strain. If it starts to smell very strange - a 'sulphury' smell - and the surface of the mixture takes on a light brown colour, then it has likely gone off and should be discarded. This should however be fairly obvious.
- Wash and sterilise (in a big pot of boiling water or with boiled water from a kettle): a strainer (preferably non-metallic, but not essential), a large wooden spoon or similar, and a 1 litre kilner jar (one jar for each cabbage worth of juice). It helps if the strainer is the right size for the top of the kilner jar. This way no mixture slides down the side and into the jar when you are straining it (if too small) or leaks down the sides of the jar and onto your kitchen surface (wasting juice - if too large).
- Place the strainer on top of the open kilner jar and spoon in enough mixture to fill it up. Allow the mixture to strain, the juice dripping slowly into the kilner jar. It may be useful to have the kilner jar resting on a clean/sterilised plate (the outside of the jar being clean also), so that if any spills down the sides, then you can pour it from the plate into the jar at the end.
- I have found that when straining the mixture into the kilner jar, it helps to apply pressure with the wooden spoon to squeeze out the juice from the blended, fermented cabbage.
- Once you have strained the mixture in the strainer, you may also wish to pour a little filtered water into the strainer to wash out the cabbage juice from the mixture (but don't add too much water or the juice will become too diluted). This is however optional and should not be necessary if you are really squeezing out all the juice from the mixture.
- Once you have finished straining the mixture in the strainer, and all possible juice has been collected in the kilner jar, then discard the solids in the strainer. Pour in more mixture into the strainer (when in place over the kilner jar) and repeat. It may be convenient to keep a plate or bowl nearby to dump the solids onto. You can of course eat the solids or even just eat the mixture as is without straining it (i.e. fermented white cabbage, i.e. Sauerkraut).
- Another straining method is to use a wide glass bowl instead of the actual kilner jar to strain the juice into. This allows you to use a wider strainer. This may be quicker, but a smaller strainer allows you more 'leverage' when squeezing juice with a spoon. Once you have finished, then you pour the juice from the bowl into the kilner jar (being careful not to spill it everywhere!) The former method however produced more juice volume and takes less steps. If you wish to use the latter method, you may choose to wash the mixture down with filtered/mineral water to flush out more juice from the mixture.
- Once you have strained all the mixture completely, then discard the used solids (or refrigerate for later eating), and secure the lid onto the jar or jars (using the sterilised rubber seal). The finished juice is a pale green/yellow colour and will have some fine sediment in it. We recommend a kilner jar with a rubber seal, as the juice produces carbon dioxide and may explode/spray everywhere upon opening if you have a non-flexible seal! As a general rule, when the kilner jars are very full, they are more difficult to pour into a glass without spilling. Ideally you should use more jars, up to 3/4 full maximum, or just be more careful when pouring the first glass from them!
- Place the kilner jars of fermented white cabbage juice in the refrigerator for storage. They can be generally stored up to 1-2 weeks in the fridge. The jars of finished juice (in the jars) should not be kept out in room temperature as you have now finished the fermentation stage. You may wish to drink a glass immediately, but it tastes better / less disgusting if you drink it chilled! My view is that whilst it isn't that tasty, it isn't totally disgusting either (easier to drink than kefir) as long as it is chilled.


N.B.: It doesn't matter too much if you add too much water, but it is best to keep it a little thick and not too watery. For the Lactobacillus acidophilus to breed effectively the concentration of 'food' for them in the mixture should not be too low. You can't have the mixture too thick; the only constraint is how thick your juicer/blender can blend. The main thing is that it is well blended with no chunks of cabbage in there, and it isn't too runny. Chunks don't do any harm, but are just a waste of cabbage as the surface area is very low for the bacteria to utilise. Blending massively increases the surface area. Keep going until you have blended a whole blender/juicer's worth.


N.B.: It is not of critical importance to avoid metallic items when preparing, fermenting and straining the cabbage, but it cannot hurt to avoid such items where possible. Of course, the chopping knife and the blades of the juicer/blender are going to be stainless steel.


It is generally recommended to have 4-8 Fluid Ounces (quarter to half a pint) daily, on an empty stomach. There is no harm in drinking more of course.
Given that it takes several days to ferment the white cabbage juice, then you may wish to start preparing your next batch when you have approximately 4-5 days supply remaining. It is up to you, how often you want to drink it and if you don't mind having a few days break in between batches. Taking a break is not necessary.
If you want to accelerate your next batch, you can use 4 fluid ounces of the juice (not the mixture) and add this quantity to each glass bowl of mixture you produce, in which case the fermentation time should be approximately 2-3 days. Please note that temperature has an effect on the rate of fermentation, so check up on your mixture every few days whichever fermentation method you are using (slow or fast).
Please note that if you have quite an old/heavily used blender or juicer, you may need to replace it. The seal at the bottom of the juicer is usually rubber which undergoes rotation during its life. After a while it may well leak every so slightly, and nasty bacteria etc can accumulate underneath the main receptacle of the juicer (the inside of the receptacle is usually cleaned, but not the underside where it connects to the base and obtains its drive). Thus small amounts of contaminated liquid may seep into your blended cabbage juice mixture. In such cases, it is advised to use a new juicer! A worn juicer is fine for blending things that are to be consumed immediately, but for the above application may result in many batches thrown away.
----------------------------------------
Of course, it is possible to just make fermented white cabbage, or sauerkraut (i.e. uncooked), by simply using the minimum of water in order to allow blending to occur, so the mixture is as thick as possible, and after fermentation is complete, instead of straining the mixture, you simply place the covered glass bowl in the fridge and take a few spoons out at a time as a side dish to a daily meal, for example. You could experiment also by adding small quantities of other vegetables (blended) or cereal grasses, algae, or even sprinkle the contents of one type of fancy probiotic capsule to add additional species of probiotic bacteria to the ferment. The main thing is that they are finely chopped or blended, thoroughly mixed in, and below the surface of the liquid, allowing the probiotic bacteria to propagate and move around. Some people add salt to a ferment, which helps to inhibit other types of bacteria, Lactobacillus acidophilus being salt tolerant and allowed to propagate and multiply. The less salt you add, the faster the ferment will occur. Ferments with less or no salt are more prone to surface moulds than those with more salt. Typically 3 tablespoons of salt are used for every 2kg (5lbs roughly) of vegetables. You could try using epsom salts rather than sea salt or a combination to provide extra magnesium in your diet. It is possible to simply add a variety of chopped/blended vegetables to water, not specifically white cabbage, but as they may not be so rich in acidophilus, may well require salt to prevent mould developing, and may well require longer to ferment that white cabbage as above. Fermentation of vegetables and milk (as kefir or live yoghurt) was commonplace before the widespread introduction of refrigerators, which has sadly displaced a healthy practice. Please see the link below for further information.
www.wildfermentation.com/resources.php?page=vegetables
Below is a recipe for Spiced Gundruk (spicy fermented radish, cabbage, carrot, onions and garlic). The sugar is used in the ferment but can perhaps be omitted.
www.recipezaar.com/Spiced-Gundruk-Spicy-Fermented-Vegetables-87792
Beetroot is another good vegetable to ferment, but would require salt per vegetable weight. Be aware that cabbage is a cruciferous vegetable and as such contains endocrine (thyroid) disrupting goitrogens which are destroyed by cooking. If you are fermenting cruciferous vegetables, it will not destroy the goitrogens, so you may not want to excessively consume fermented cabbage, broccoli, cauliflower and other cruciferous vegetables.
back to top
2. Kefir.

Kefir is a different kind of beneficial bacteria culture to those used in natural yoghurt. In many ways it is more beneficial for your health. It tastes rather different too. It is commonly sold and consumed in Eastern Europe and Scandinavia.
Studies have shown that kefir grains contain 40 strains of lactic acid bacteria:
- Lactobacillus delbrueckii subsp. delbrueckii (8 strains)
- Lactobacillus delbrueckii subsp. bulgaricus (6 strains)
- Lactobacillus kefir (2 strains)
- Lactobacillus acidophilus (1 strain)
- Lactobacilllus lactis subsp. cremoris (3 strains)
- Enterococcus faecalis (7 strains)
- Enterococcus faecium (2 strains)
- Streptococcus thermophilus (1 strain)
Access to this information via the link below is now for subscribers only.
www.cababstractsplus.org/google/abstract.asp?AcNo=20053010999
Other bacterial and yeast species have also been identified, in the paper 'Lactic acid bacteria and yeasts in kefir grains and kefir made from them' (2002). Simova E, Beshkova D, Angelov A, Hristozova Ts, Frengova G, Spasov Z.
83-90% of the microbes present in Kefir are lactic bacteria and 10-17% are yeasts.
'In the microbial population of kefir grains and kefir made from them the homofermentative lactic streptococci (52-65% and 79-86%, respectively) predominated. Within the group of lactobacilli, the homofermentative thermophilic species L. delbrueckii subsp. bulgaricus and L. helveticus (70-87% of the isolated bacilli) predominated.'
Yeast species identified in this document include:
- Kluyveromyces marxianus var. lactis
- Saccharomyces cerevisiae (yeast)
- Candida inconspicua
- Candida maris.
Please note the above Candida strains are not the same as the pathogenic Candida albicans.
www.ncbi.nlm.nih.gov/pubmed/11938463
In addition to the proliferation of the above bacterial and yeast species in fermented kefir, lactic acid and alcohol is produced. The alcohol content tends to be between 0.2 and 2% volume.
Kefir can be made using cow's milk or goat's milk. From organic or non-organic milk. And from pasturised milk or live milk. It can also be made using any type of milk that contains natural sugars (for example, soya milk or rice milk); and it can even be made using water and sugar (although one runs the risk of consuming refined sugar left over which has not been fermented). The best type of dairy kefir is probably live (raw, grass-fed) organic goat's milk, with pasturised organic goat's milk running a close second (with the added benefit that it can be purchased in supermarkets and not farmer's markets). Water kefir is most convenient as it does not require the purchase of fresh milks or expensive diary milk alternatives.
There are two ways to make your own kefir; from freeze-dried kefir culture, which is simply added to a kilner jar of milk; or from live kefir granules. Live granules can be purchased or more conveniently, freeze-dried granules. Whilst kefir produced from granules is no doubt better than that produced just from powdered kefir culture, it is more labour intensive. Kefir granules should be purchased according to the type of milk they will be fermenting, i.e. water kefir grains or granules to make water kefir; milk kefir grains/granules to make milk kefir etc. It is possible to migrate dairy milk kefir grains to use with soy milk or almond milk, or even water kefir, and vice versa, but it may take a few batches for the grains to get used to the new medium. Purists will make kefir from live goat's milk (or sugary water!) and live kefir granules. Others will make kefir from pasturised organic goat's milk (or other non-dairy milks etc.) and/or freeze-dried kefir powder.
The recipe below uses freeze-dried kefir powder. The manufacturer of the sachets pictured states that one sachet is suitable for 1L of cow's/goat's milk. Recommendations will vary according to size of sachet, concentration and manufacturer.

It is recommended to use glass kilner jars between 1L (1 quart) and 3L (3 quarts). You will require a minimum of 2 jars. The jars should have a rubber seal. Kefir gives off carbon dioxide as it ferments, and without a rubber seal, the jars can explode! One should use sterilised jars (boiled in water for a few minutes) and a sterilised non-metallic spoon and sieve (if applicable).

With freeze-dried kefir powder, one simply empties the sachet into a kilner jar full of goat's milk, the volume according to the packet's instructions;

Stir the mixture with a sterilised non-metallic spoon (e.g. pour boiling water over a ceramic spoon, then allow the spoon to cool down before use).
Now seal the kilner jar;

Leave the kilner jar in room temperature in the kitchen for 24-36 hours, or until it is sufficiently thick, gassy and sour. It is recommended to stir the fermenting kefir or shake the kilner jar in the morning and evening to ensure even distribution of kefir bacteria. Any separation that occurs is nothing to worry about and is a sign that you should stir/shake the contents to mix it again.

In general, the longer you leave the kefir to ferment, the thicker, potentially lumpier, and more acidic/pungent it becomes. Some may find thicker kefirs a little unpalatable. Experiment to see what thickness of kefir you prefer.
Once sufficiently thick and sour, the kefir is now ready, and should be stored in the fridge. The kefir will ferment much more slowly in the fridge and may last up to 1-2 weeks.
Below is an example of a light kefir.


Below is an example of a thicker kefir.
Depending on your fridge size, you may wish to store the kefir in small kilner jars (e.g. 1L kilner jars). If transferring to another type/size of container, ensure that the recipient containers are sterilised with boiling water first. You can also ferment the kefir from the beginning in smaller kilner jars.
To make new batches, one simply takes 3 tablespoons of kefir from the previous batch (per litre/quart of milk to be added to) and pours it into the kilner jar of milk and stirs. This new jar is as similarly kept in room temperature for 24-36 hours, and is ready for drinking, and is stored in the fridge. One can recycle the kefir in this manner between 7 and 10 times before the more aggressive acidophilus bacteria take over and the actual kefir bacterial content is minimal. After this, one can start a fresh batch with a new kefir sachet. Of course, one can prepare 2 or 3 jars of kefir at once from a single batch of kefir, and these all count as the same (subsequent) batch. A jar of kefir will keep in the fridge for 1-2 weeks. Unused kefir can be frozen and kept for up to 6 weeks, if you are going away on holiday for an extended period.
It is generally wise to stick to one type of milk when making new batches of kefir. For example, if you started making kefir from cow's milk, it is best to stick to cow's milk in subsequent batches, rather than switching to goat's milk. I have tried going from cow's milk to goat's milk and back to cow's milk in consecutive batches, and the net result wasn't great, with the kefir bacteria eventually fermenting extremely slowly and almost never reaching its full end point.
The freeze-dried kefir powder used in this example, by Ascott, is intended for use with dairy milk. I tried it one time with soy milk, but it was not entirely successful. It did not ferment very well at room temperature, but did ferment properly in an airing cupboard which was somewhat warmer. A yoghurt maker is probably ideal, Moulinex do a Yoghurt Maker with small glass pots (most are plastic), which will maintain a constant temperature.
In general, if you do intend to use it anything other than dairy milk, then you may need to transition from one type of milk to another, starting with dairy milk and slowly adding more and more soy milk to it until it is finally just soy milk. However, as there are only up to 10 batches possible before acidophilus takes over the culture, it may not be enough time!
With kefir granules, one empties the live kefir granules into the kilner jar of milk and leaves covered for 24-36 hours, as described above. However, before the kefir can be used, the kefir must be strained into another kilner jar, so that the granules can be reused. The granules are then rinsed with milk or water, and then placed into the next kilner jar of milk. More detailed instructions for making kefir from live granules can be found at the links below.
Freeze-dried granules can be used in much the same way as live kefir granules, but they must first be 'activated', by soaking in milk.
www.seedsofhealth.co.uk/fermenting/kefir_howto.shtml
General information about milk and water kefir can be found at the links below:
http://users.sa.chariot.net.au/~dna/Makekefir.html
www.mercola.com/forms/kefir.html
www.seedsofhealth.co.uk/fermenting/kefir.shtml
http://users.sa.chariot.net.au/~dna/kefirpage.html
http://nourishedkitchen.com/water-kefir/
http://jenohsays.com/eating/all-about-water-kefir/
www.wholetraditions.com/articles/3-water-kefir-instructions
Water kefir recipes do vary, but the basic ingredients are water, water kefir grains and sugar (can be brown or white). Some recipes call for a pinch of Calcium Citrate or similar and a quarter of a teaspoon of baking soda per litre of water. Others suggest including a few pieces of dried fruit.
It is possible to buy live kefir at many retailers on the European continent. However, seeing as it is so easy to make, there is no real purpose - and it is more expensive.
The kilner jar was invented in the mid 19th Century by John Kilner, the great-great-great-great grandfather of British broadcaster and like him or loathe him Top Gear presenter Jeremy Clarkson!
There may be issues with home fermented products, such as the yeast content, for those with elevated free glutamate levels, and for those with existing yeast (Saccharomyces cerevisiae) overgrowth, as discussed in the Yeast section on the Bacterial page.
back to top
3. Mutaflor (E.coli strain Nissle 1917) Yoghurt

Mutaflor is the brand name for the probiotic species of Escherichia coli (E.coli), known as strain Nissle 1917 or Mutaflor for short, which is manufactured by German firm Ardeypharm. It is a beneficial species of E.coli. For detailed information on the properties of Mutaflor, please see the Mutaflor section on the bacterial page.
www.mutaflor.com/
Mutaflor can now be purchased both in capsule or suspension form (as of 2009). The capsules are enterically coated and are designed to open up in the terminal ileum. Each capsule contains 2.5-25 billion viable cells. The product is available in 'mite' capsule form, where the strength is only 20% of the regular capsules, for use in severe cases where the patient cannot tolerate the stronger capsules at first. Dosage is 1-2 capsules per day, taken with food and sufficient liquid.
Mutaflor is also available in suspension form, in 1ml or 5ml vials, presumably at the same strength as the capsules described above. They have been designed primarily for use with infants and toddlers in mind, who cannot easy swallow capsules. Of course, one could break open a capsule and sprinkle the contents into food etc., but this may not be so easy and of course would negate the benefit of the enteric coating. The suspension of Mutaflor bacteria is clearly not enterically coated in any way. The suspension form is much more expensive than the capsule form. There is a cost saving with Yoghurt making, as once one starts off the Yoghurt culture with one 5ml vial of Mutaflor, one does not need to buy any more, and one can use 2-3 tablespoons of Yoghurt from the previous batch for the next batch, and again, ad infinitum.
The suspension form can be used in this context to make Yoghurt, although it is likely one could use the capsule form also by breaking them open. Yoghurt made using Mutaflor differs from the other forms of Yoghurt, Kefir and Sauerkraut mentioned on this page as the bacterial strain is isolated in the capsule or suspension form, so there will be no other bacterial or yeast strains present, i.e. no yeast.
A recipe for making Mutaflor soy Yoghurt can be found on Dr Sarah Myhill's web site.
www.drmyhill.co.uk/wiki/Growing_Mutaflor
www.drmyhill.co.uk/wiki/Fermentation_in_the_gut_and_CFS
One can of course apply the same principle for making Mutaflor yoghurt with most other types of probiotic and use them to make yoghurt or an equivalent to water kefir. This would avoid the inclusion of yeast species in your end product, and if prepared properly, only the bacterial species present in the probiotic capsule that you emptied into the liquid. You could try using dairy milk, soy or other vegan milk neat or with added sugar; or try water with added sugar. You may need to experiment with the optimum temperature, using either a yoghurt maker or a thermos flask (which can maintain higher temperatures than a yoghurt maker that is typically at around 21C, and also duration. You may need to experiment. Examples of other probiotics you could use are Securil or Renew Life's Ultimate Flora Super Critical powder.
back to top
4. Kombucha.

Kombucha is a type of fermented tea, made with the kombucha culture (Fungus japonicus). The kombucha culture is said to contain the following micro-organisms. This symbiotic culture helps to drive out unwanted foreign organisms.
- Bacterium xylinum
- Bacterium xylinoides
- Bacterium gluconicum
- Saccharomyces ludwigii
- Saccharomyces apiculatus varieties
- Schizosaccaromyces pombe
- Acetobacter ketogenum
- Torula varieties
- Pichia fermantans
- other yeasts (Saccharomyces boulardii has been identified in some SCOBY's)
http://en.wikipedia.org/wiki/Kombucha
Kombucha consume sugar and in conjunction with the fermentation of tea, produce a variety of beneficial organic acids and other nutrients such as:
- Glucuronic acid - used in liver function
- Gluconic acid (oxidised form of Glucose - a prebiotic)
- Lactic acid
- Acetic acid (Vinegar)
- Butyric acid - helps lower colon pH and can be metabolised as a sugar under certain circumstances
- Hyaluronic acid - healthy skin
- Chrondroitin Sulphate - nutrient in joint health
- Mucoitin Sulphuric acid - adds to gastric juice concentration
- Malic acid - a Krebs cycle acid used in Mitochondrial function
- Usnic acid - antibacterial to gram-positive bacteria and anti-fungal; also anti-inflammatory
- Vitamins, particularly B vitamins and vitamin C
- Amino acids
- Enzymes
Kombucha is consumed more for its beneficial nutrients (particularly for liver function and detoxification) than its bacterial content, and purely as a probiotic, is not the best around. Kefir is arguably the better probiotic drink with many more probiotic bacterial species.
www.happyherbalist.com/kombuchamushroom.aspx
'According to Traditional Chinese Medicine, Kombucha tea was referred to as the Tea of Immortality and the elixir of life (Tsing Dynasty, China 250 BC.) Kombucha balances the Middle Qi (Spleen and Stomach). By aiding the stomach to better digest food and by assisting the spleen to deliver more nutrition, the body heals itself. Kombucha helps to break stagnation, reduces damp and phlegm and expels toxins from the body. Hence the Chinese reference to kombucha tea as the Immortal Health Elixir.'
There are a number of types of tea leaf you can use in order to make it. Green or white tea may offer the most health benefits but black tea usually produces the best ferment. For the first batch one may wish to use purely black tea as it will produce the best results. After that, one can use other tea types, e.g. white or green tea (e.g. organic Sencha), but mixing these types with 50% black tea may provide better fermentation results. One may wish to experiment with other leaf types (not related to the tea plant), and they should work as long as there is 50% black tea present.
- To prepare one makes an amount of very strong green tea (2 teaspoons of tea leaves per litre/quart of boiling water). One may wish to strain/remove the tea bags/leaves after a few minutes or leave them in there until the mixture has cooled down.
- Add a quantity of white sugar - 70-100g per litre/quart - brown sugar is reported by many to result in a poor fermentation, but a friend of mine, Bob, has had excellent results with Demerera sugar. Honey could theoretically work as the enzymes that produce H2O2 (antimicrobial) would be destroyed by the heat of the boiled water. Some recommend boiling the water with the sugar in it, but for no longer than 5 minutes.
- Pour into a large jar and allow to cool down to 20-25C (68-77F) - any higher or the Kombucha culture will be killed; any lower and the SCOBY (see next step) will hibernate.
- Add the Kombucha 'SCOBY' (Symbiotic Colony of Bacteria and Yeast - the bacterial culture). For the initial batch, a small amount of lemon juice (or possibly vinegar) can be added to increase the acidity to help the fermentation start.
- Attach a muslin gauze or similar material to the top of the jar (as long as it is breathable) and affix with a rubber band or string or otherwise; to stop dust or insects getting in.. The fermentation is aerobic unlike Kefir, so a sealed lid should not be used on the mixture.
- Allow to ferment for 6-12 days, until the pH is less than 3.0. pH test strips can be used for this purpose, although one must of course extract a small sample to test rather than dipping the strips into the main mixture. Preferably allow to ferment in the half shade or darker, e.g. in a cupboard or other dark area at room temperature. If the liquid becomes too cold, fermentation will take longer.
- Once ready, remove the scoby and use for the next batch - or store the scoby in a small amount of cold sugary tea, but covered up with muslin.
- The ready Kombucha should be stored in the fridge, which will slow down the fermentation. It can also be bottled (dark brown bottles are best as they prevent light from oxidising/damaging the contents). One can refrigerate these bottles or store them at room temperature. Opinion is divided on this, however once opened, and exposed to more air, they should be stored in the refrigerator. If the Kombucha goes vinegary and sour, then it has over-fermented.
One can also make a kombucha without a scoby if one has purchased a commercially available source of kombucha or kombucha extract/concentrate. One does not need to buy a Kombucha mother culture scoby to start making Kombucha tea. One simply adds an amount of the pre-purchased Kombucha tea to the above ingredients (i.e. tea made with purified water and added sugar) and leave to ferment for a couple of weeks. During this time a scoby will form on the top, which will first appear as a white film and thicken as it goes along. When this kombucha is ready, you can consume it and save a small portion to make the next batch. If you have a fully formed SCOBY then you can use it with the next batch to make Kombucha with the mother culture, which should speed up the fermentation process a little. Below is a video from two 'dudes' describing this process:
http://www.youtube.com/watch?v=fi4TZ6aTUg4
General recommendations are to consume 2-4 fl. oz. a day, before meals. Maximum dosage after some time might be between 8 and 16 fl. oz. per day. Enjoy!
Kombucha does contain trace amounts of alcohol, caffeine and unfermented sugar. The alcohol is produced by the yeasts, which is turned into acetic acid (vinegar) by the Gluconacetobacter xylinus bacteria. Kombucha tends to have an alcohol content of 0.5 and 1%.
The longer it ferments, the more acetic acid is produced, and the more sour it tastes.
The amounts of Kombucha consumed are however generally relatively small, i.e. a few fluid ouces, one is not generally drinking huge glasses of the stuff!
According to forum member 'Skooter':
http://kombuchatea.tribe.net/thread/355c587f-ee8e-4265-a05b-bed218cd3d6a
One of the mid-process fermentation byproducts of Kombucha fermentation is the biotoxin Acetone. It is normally produced in very low concentrations however and is catabolised fairly quickly into other compounds such as Butyric acid (a healthy Short Chain Fatty Acid) that help to feed the fermentation process. In the absence of oxygen (i.e. when bottled), this catabolism process is halted and the acetone levels slowly increase. This is particularly evident if the bottles are stored at room temperature or in warm conditions, and may take 4-5 days. It is a type of secondary fermentation (after the Kombucha is bottled). One should notice the acetone smell as it is quite sweet but chemical-smelling (nail polish remover smell). This process may be slowed down if the bottles are stored in a cool place, preferably the fridge; or if the bottles have a little air in them.
I have also heard from a forum member that acetone only forms after prolonged storage at room temperature in sealed bottle form (without oxygen) but that it does not occur with oxygen!
According to a fermentation expert friend of mine, Bob, Kombucha's alcohol content can rise to 5% plus if bottled and sealed for storage. This is an aerobic fermentation process. After the oxygen in the sealed bottle has been used up, the fermentation will change to anaerobic (most of the aerobic bacteria and yeasts dying out), whereupon the alcohol is converted to vinegar. One of the other results of the anaerobic (incomplete) fermentation is the formation of Acetone. In general, it is ok to store freshly bottled Kombucha for a few days, until it goes gassy (with CO2) but to drink it shortly after this. Timescales for the above may vary.
According to Alana Pascal, bottled Kombucha should be transported refrigerated, and when stored in the fridge, done so with the bottle top off to allow oxygen in, and consumed within about 4 days. Clearly this is counter to all the ready-made Kombucha tea manufacturers recommendations. There seem to be many opinions on this subject with no one really presenting any convincing scientific facts either way.
Other sources recommend eliminating the air space in the bottles to slow down fermentation. Gaia Kombucha stated in an email to me that acetone formation only occurs gradually over time when the bottles are stored at room temperature, but the process is accelerated considerably once the bottle is opened, when it is best to store it refrigerated. This is the exact opposite of what Pascal stated!
Commercially prepared kombucha tea bottles are normally stored refrigerated at the retail outlet, so the only secondary fermentation time is during transit (more of an issue in the summer than winter probably depending on storage depot facilities etc.) Plane cargo holds are cold. If you do purchase multiple bottles, then they are best kept refrigerated, even if unopened.
Acetone, also known as propanone is a volatile ketone. It is naturally produced in the body in very small quantities and metabolised and thus eliminated. However, in the context of Kombucha, the quantities ingested may be somewhat larger. It has a low toxicity and may temporarily suppress the nervous system, as all other solvents do. It has a low boiling point of 56.5C (134F), and as such can largely be boiled off if one is using Kombucha Extract and adding it to boiled water (see further below).
http://en.wikipedia.org/wiki/Acetone
Home fermentation of course brings with it potential risks of contamination by foreign pathogenic bacteria and yeasts, e.g. bacteria from potted plants, which can be very unhealthy. The growth of these should be evident on the SCOBY. The FDA has expressed concern over possible contamination of Kombucha with Aspergillus and Candida bacterial species. There has even been one reported case of Anthrax from using Kombucha topically. Preparing Kombucha in ceramic or possibly plastic containers is reputed to potentially leach contaminants into the final beverage.
The majority of claimed benefits of Kombucha tend to come from end users' testimonials rather than clinical trials, and few of the claims have any solid evidence behind them and are speculative in nature. Many of these benefits might derive from the green tea content to some degree, although clearly the organic acid content has many healthy aspects. There is however very little research on Kombucha in humans - most is on rats. Most studies do not seem to be entirely positive in their conclusions.
Some adverse effects from (possibly excessive) Kombucha consumption have included upset stomach, allergic reactions of varying degrees, adverse effects on the kidneys, liver toxicity, skin complaints and even metabolic acidosis (too low a blood pH).
There may be issues with home fermented products, such as the yeast content, for those with elevated free glutamate levels, and for those with existing yeast (Saccharomyces cerevisiae) overgrowth, as discussed in the Yeast section on the Bacterial page.
The following books may be useful with regards to general issues relating to Kombucha making, including storage issues:
Gunther, Frank. 1991. Kombucha - Healthy Beverage and Natural Remedy from the Far East. Verlag Ennsthaler.
Pascal, Alana. 1995. Kombucha: How to and What's it all about. Van Der Kar Press.
I have not personally yet made Kombucha but has been highly recommended to do so by close personal sources, including my friend Aaron. In the interim, please see the links below for further information. I will update this section once he has been successful, with some tips and so on.
Please see the links below for more detailed instructions and opinions on Kombucha making.
http://users.sa.chariot.net.au/~dna/kombucha.htm
www.sulis-health.co.uk/kombucha/faq.shtml
www.mycosource.com/kombucha.htm
www.happyherbalist.com/brewing_kombucha.htm
www.acupuncture.com/herbs/kombucha1.htm
www.suite101.com/content/kombucha-tea-recipe--cider-with-health-benefits-and-history-a231292
www.seedsofhealth.co.uk/fermenting/kombucha.shtml
www.seedsofhealth.co.uk/fermenting/kombucha_howto.shtml
www.seedsofhealth.co.uk/fermenting/kombucha_teas.shtml
www.seedsofhealth.co.uk/fermenting/index_kombucha.shtml
www.mycosource.com/kombucha.htm
Below are some pictures of Aaron's kombucha culture (in storage). The same type of jar can be used for the actual fermentation stage.


Below are some pictures of Aaron's finished kombucha, ready to drink (culture removed, kombucha filtered).


Regarding fermentation of probiotics:
Most fruits contain sugars (fructose) that will ferment when combined with wild or airborne yeasts and bacteria. That is both good and bad news. Sugar is good, just we can't be sure what wild or airborne yeasts and bacteria may be present. There is also sugars in certain herbs such as ginger and ginseng and in berries like wolfberries and Da Zao (dates).
Technically in a ferment cycle there are two types of activities going on; one is fermentation (anaerobic - without oxygen) and the other respiration (aerobic - with oxygen). However in Kefir (mainly anaerobically - without oxygen) and Kombucha Tea Brewing (achieved aerobically - with oxygen) common usage refers to this process as fermentation.
Water should be of the highest quality and free from contaminants like chlorine (i.e. use purified water or mineral water). The amount of oxygen and carbon dioxide present in the water will also be a determining factor in this process. Water boiled for kombucha tea production should not be overboiled to ensure enough O2 is still present in the water.
Yeast either via acid hydrolysis or by producing enzymes cleaves sugar into glucose and fructose. Glucose is the energy source of our biological cells, and the energy source of our Probiotics. The glucose portion is what we are interested in. The synergy of the yeasts cleaving the sugar and the bacteria producing acids results in the common denominator that defines Kombucha Tea as Kombucha Tea (and not something else) as acetic acid, gluconic acid and fructose. The major variables; Sugar, Tea, Temperature, Time and Oxygen, all further refine and define your fermentation.
Sources of ready made Kombucha tea depend on your area, but some examples are listed below.
Bottled Kombucha Tea:
- Dr med. Sklenar's Original-Kombucha Classic & Original Kombucha with Green Tea (Germany)
- Pronatura Original Kombucha Tea (German Kombucha resold in US)
- Kombucha 2000(ArdeShir Farshchi's A.F. Distribution) (Organic) Fermented Tea (US)
- Gaia Orgamic Kombucha Fermented Green Sencha Tea (UK)
- Lewtress Kombucha (UK)
As stated above, Kombucha tea is best consumed when freshly fermented. When ready, it should ideally be refrigerated and consumed in a few days. Ready made Kombucha is generally stored refrigerated at the point of sale, but not always. Bottled Kombucha will still continued to ferment. When being transported/shipped, it should ideally be shipped refrigerated. Once purchased, it should absolutely be stored in the refrigerator and consumed within a few days. Some manufacturers, e.g. Kombucha 2000, list it as 'perishable product' on the label and that is should be refrigerated. It does not state however whether this is before or after opening. Gaia Organic Kombucha state that the bottled Kombucha does not need to be refrigerated when bottled and unopened, but when opened should be refrigerated. Generally the manufacturers are a little tight lipped or understated about the secondary fermentation issues surrounding Kombucha.
As well as buying ready made Kombucha tea, one can also purchase Kombucha concentrate, Kombucha extract and Kombucha extract dried capsules. It is likely that the fresh, live tea contains the most bacteria and yeasts, but if you want just the nutrients, especially the Glucuronic acid, then any of the formats will be suitable, arguably the tea being the most awkward storage-wise.
Kombucha Concentrates:
- Happyherbalist.com's Kombuchal Kombucha Tea 35x Concentrate (US)
Happyherbalist's Kombuchal Concentrate is made through dehyration Kombucha tea over a low heat, through temperature (?) vacuum distillation. It is implied that it contains bacteria and yeast cultures although it is not actually stated. It would still presumably retain the same sugar content.
Kombucha Distillates:
- GetKombucha.com's 15x Concentrated Kombucha (US)
- HappyHerbalist.com's Kombucha Mushroom Tea Distilled (Hydrosol) (US)
GetKombucha's concentrate is made through a proprietary distillation process - what effect this might have on the bacteria and yeasts, I am not sure about, but the product is claimed to have an unlimited shelf life.
HappyHerbalist's Hydrosol is the water soluble distillate remaining after the oil-soluble parts have been extracted. It is a clear solution. This would still presumably retain the sugar portion from the original kombucha tea.
Kombucha Liquid Extracts:
- HappyHerbalist.com's Kombucha Mushroom Tea Pure Extract (US)
- Dr med. Sklenar's Original Kombucha Classic _ Press Extract (Germany)
- Pronatura Original Kombucha Press Extract (5:1) (German extract resold in US)
- Kombucha 2000(ArdeShir Farshchi's A.F. Distribution) Tea Extract (5:1) (US)
The extracts may come from both the tea and the actual SCOBY. Whilst the nutrient content of some of these formulas has been studied, little or no studies seem to have been performed on the actual live bacterial/yeast content of these preparations. It may depend on the type of extraction or concentration method and any other treatment that has been applied. Dr med Sklenar has stated to me that it is 'understood that the friendly pro-life bacteria is present'. However, Pronatura, resellers for Dr med. Sklenar, stated to me that they do not think that either the extract liquid or the capsules contain any live bacteria or yeasts! So it is anyone's guess, but it is likely that the amount is perhaps somewhat reduced at least.
Some Kombucha concentrates contain added alcohol to presumably keep the ingredients fresh and safe from bacterial breakdown and extend the shelf life, and perhaps to slow down the fermentation process also. One example is Pronatura's Original Kombucha Press Extract, which contains 10% alcohol by volume. It does not contain any sugar however, which is a large bonus - but there must be some trace amounts or it would not continue to ferment once opened and stored in room temperature. The kombucha concentration is not declared. This alcohol level does not kill the bacterial and yeast cultures however.
According to Happy herbalist.com, even at 15% alcohol concentration, the cultures are not harmed but continue to ferment (albeit at a slower rate), but at 25% alcohol concentration, the cultures are killed.
http://happyherbalist.com/german_kombucha_patent.htm
Kombucha 2000's liquid extract is stated to not require refrigeration. Pronatura's press extract does not make any statement regarding refrigeration. It is surely 'safer' to refrigerate these extracts and concentrate product in any case, and can do no harm. If one cannot establish the exact bacterial and yeast content, then refrigerating them will at least slow the secondary fermentation process down.
I have found with Pronatura's Press Extract that once opened, the liquid goes somewhat cloudy after a day, having previous been clear when unopened. I am not 100% sure, but the product also seemed to smell slightly more vinegary after opening and leaving at room temperature, although it is hard to tell. It also seemed to give off a little CO2 after having been been first opened with the top screwed on. This process seems to be slowed down somewhat if the bottles are kept in the refrigerator after opening. This would suggest that there is some live bacteria and yeasts in the conconction. It is probably best to keep them stored unopened or opened in the refrigerator in any case.
If you are consuming a concentrate, distillate or extract product, it is unlikely that the live bacterial and yeast content is that high, and the main benefit is likely to come from the active chemical ingredients. Given the fact that acetone has a low boiling point, it is therefore probably just as well to add these products to freshly boiled water, to drive off the Acetone (and alcohol if present) and kill off any pathogenic bacteria if present, as the BPs of the non-solvent ingredients is likely to be much higher. This may also damage the enzymes present which would otherwise be intact.
Extract Capsules:
- Kombucha 2000 (Organic) Fermented Tea Capsules (555mg per capsule - >5% Glucuronic acid)
- Pronatura Original Kombucha Capsules (450mg per capsule)
- Garden of Life Vitamin Code RAW Kombucha (250mg per capsule)
Kombucha capsules will most likely contain spray dried Kombucha.
According to Pronatura, the Kombucha capsules in general do not contain any live bacteria or yeasts. With capsules you know there is no fermentation going on, as they are dried at the point of the Kombucha being ready, which is a convenient aspect. They are also light to carry.
Pronatura and Happyherbalist use the original Dr Sklenar (German) fermentation method. Pronatura are resellers of Original-Kombucha Classic Tea and Press Extract by the German company Dr med. Sklenar Kombucha-Produkte e.K. (www.originalkombucha.de). Pronatura however also market Kombucha capules, a product which Dr med. Sklenar do not manufacture, so presumably this is a US product derived from the German Kombucha.
The extract capsules presumably have the same sugar content as the source Kombucha tea, which you could test by opening up the capsule and tasting the powder.
Tea Bags:
Kombucha is also available in tea bags, e.g. Yogi Tea Green Tea Kombucha Decaf. Clearly if you place such a tea bag into boiling water, then you will kill off all the bacteria and yeasts in the Kombucha extract impregnated into the tea leaves, assuming that the extract in the tea bags was live to start with. Such a beverage will still provide the benefit of the organic acids and other nutrients present in Kombucha, depending on how much Kombucha is in each bag to start with, buy clearly not provide any probiotic organisms. Of course, there is no risk of pathogenic organisms either. Nor of yeast overgrowth in the gut from kombucha extract in hot water consumption.
back to top
5. Psyllium & Bentonite (P&B) Shakes.

Please see the Psyllium & Bentonite (P&B) Shake section on the Mucoid Plaque page for the full preparation instructions. P&B shakes are taken to remove mucoid plaque from the large and small intestine, and are non-digestible.
back to top
6. Sole.
A good way of introducing more sodium into the diet is to take Himalayan Crystal Salt (shown above). This can be purchased as a powder (below) or as granules (above) or even in large pieces.
A convenient way to take this is as a saturated salt solution. This is known as sole (pronounced 'so-lay').

To prepare sole, first find an empty screw top jar, and wash it out thoroughly so no organic matter remains in it. Put a large rock of Himalayan Crystal Salt into it or alternatively several heaped tablespoons of granulated or powdered Himalayan Crystal Salt into it. You cannot put too much salt in. Then fill up the jar with water (preferably ionised, mineral or filtered water). The idea is to create a saturated solution. Any excess with rest on the bottom of the jar. If you find that the level of salt in the bottom looks too low, then add more salt. If you are using rocks, then they sit in the saturated solution and look quite attractive (!) Stir vigorously. Screw the top on the jar. Leave out for 24 hours (a whole day's light basically). Stir at least once more, half way through the day for example, as otherwise the solution may not saturate properly. After a whole day spent in the light, the sole is ready to use. You can then start using it every day. Take 1-2 dessert spoons (10ml) each morning (for example). Always take a few sips of water afterwards or it will 'burn' your throat and lips and feel uncomfortable in your stomach.

Once the sole has been prepared, do not keep it in the refrigerator or in the cupboard. It should remain exposed to natural daylight every day. Bacteria will not survive in it. When the sole level gets too low, then add more salt and water. If the salt level gets too low, then there is a risk that the sole is not fully saturated, so add more if in doubt. There should always be an excess of crystals in the jar. As the crystal levels get low, add more crystals. As the water level gets low, add more mineral water.
Whether the following iron oxide particles suspended in solution in this jar of Sole made with magnetised/ionised water (I-Water) are thus because of the properties of I-Water or whether they would be suspended in this manner with ordinary distilled water is perhaps a matter of debate!


Consuming small quantities of sole or even minute quantities of sea water (along with fresh water obviously!) are noted as being an effective way of absorbing sodium rather than sprinkling dried or crystalline salt onto food, which tends to be absorbed slightly less efficiently by the body.
It is not recommended to drink sea water in any volume if one does not have a supply of fresh water to hand, as it will dehyrate the body and can be potentially life threatening. This is why survivors in shipwrecks are told never to drink sea water.
Sole has various benefits other than its sodium content. Suppliers of Himalayan Crystal Salt can be found on the links page.
Some information on the benefits of Sole can be found at the web site below.
http://www.natural-salt-lamps.com/sole.html
back to top
7. Potassium Broth.
Potassium Broth is a mineral rich broth made with a variety of organic vegetables and vegetable peelings; the idea being that the majority of the minerals of specific vegetables are located in the skin/peel, and thus these minerals are extracted by prolonged boiling. It is critical that only organic vegetables are used, as the skin of non-organic vegetables tends to be most concentrated with herbicides/pesticides and fertilisers, and we don't want to extract these! The broth is also known as Potato Peeling broth. The recipe is quoted from Dr Schulze's own recipe, and he proposes the use of Potassium Broth as a part of a Kidney/Bladder Cleansing programme, although he also recommends that everyone should drink such a broth every few months.
www.herbdoc.com/p35.asp
http://curezone.com/schulze/herbal_5day_kidney_cleanse.asp
The recipe for making this broth is described below.
- Use a large pot
- Briefly wash all your vegetables prior to chopping/use.
- Fill 25% of the volume of this empty pot with potato peelings from organic potatoes. This may be the peel from 20-30 organic potatoes. What you do with the peeled potatoes is up to you! Cook them, or throw them on the compost. It is the peels that we are interested in.
- Fill 25% of the volume of this pot with carrot peelings and whole chopped beets. This should bring the level up to the half way mark. The number of carrots will be far greater than the numbe of beets required, because we are only using the carrot peelings, but the whole of the beets. Chop the beets into sections, perhaps a third of an inch thick, and throw them in. No need to peel them. You can also include the greens/stalks from the top of the beets and throw these into the pot also.
- Fill 25% of the volume of this pot with chopped whole onions and garlic. This should bring the level of vegetables up to the three quarter mark. You do not need to peel several layers off the onions. Simply discard the first outer layer, and roughly chop the remainder of each onion (half to third of an inch wide slices) and throw this into the pot. The garlic cloves do not have to be individually peeled and chopped. You can simply roughly crush each clove, without peeling it and throw it into the pot. You may use perhaps 60 to 100 individual cloves of garlic.
- Fill 25% of the volume of this pot with whole chopped celery and dark greens. This should bring the level of vegetables up to the brim of the pot. Use whichever dark greens you fancy, but the main point is to include a large proportion of whole, roughly chopped celery.
- Add freshy ground Cayenne or roughly chopped chilli peppers to taste (pick those that are red and ripe, the hottest you can find.
- Add enough distilled water to cover. You can buy deionised water in a supermarket or car cleaning accessories store. Otherwise use filtered or mineral water. Distilled water is used as it contains no mineral content whatsoever and is more likely to draw out more minerals than water that is already partially saturated with minerals.
- Simmer on a very low temperature for 1-4 hours.
- Strain the broth into a jug or kilner jar (with sealable lid). Discard the solids - in the bin or compost heap. You should now be left with a red/brown clear liquid.
- Drink the broth over 2 days. Refrigerate what you do not immediately use.
back to top
8. Herbal Tinctures:

Introduction:
A herbal tincture is a solution of a plant or herb extract, usually made with alcohol or an alcoholic solution. It is basically made by placing herbs into a container of alcoholic solution, sealing it, leaving it in a cool, dark place for a few weeks to a few months (shaking daily), then straining the mixture and bottling it into small dropper bottles. The tincture can then be taken a few drops at a time or as required.
The presence of alcohol helps to extract active ingredients from the herbs in question and dissolve them into solution, making them more readily absorbable than other forms of herbal medicine, such as infusions (teas) or decoctions, or eating the actual herbs themselves. Alcohol also is a preservative, allowing extended 'steeping' in the preparation stage and also a longer shelf life for the final product.
Herbal tinctures are available to buy of course, but it is extremely easy to make your own, and if you are taking significant amounts of any herb, such as Cilantro/Coriander leaf during a cellular detoxification programme, then it may be cost effective to make your own Coriander leaf tincture. Tinctures and herbs, such as Cilantro/Coriander Leaf amd Milk Thistle, their purpose and application regarding detoxification and liver support (respectively), are discussed on the Detox page. Other herbs are discussed elsewhere on the site.
Choice of Alcohol Solution:
When it comes to what alcohol solution to use, it is normally best to use as strong type of alcohol as possible, with as little flavouring and colouring in it as possible, to ensure maximum absorption from the herbs. No colour is also important when it comes to viewing how well the tincture is coming on during the 'steeping' process. Vodka is the booze of choice for making herbal tinctures. Strengths vary from 37.5% to 50% volume. The vodka is by far the most expensive ingredient in a tincture as the actual herbs themselves are relatively cheap in comparison. It would be tempting to use as strong a type of alcohol as possible, i.e. 100% proof 50% volume Vodka, but often the strongest Vodkas are not the most cost effective way to buy alcohol. It may be better value for money to buy a slightly weaker Vodka, and even one from a non-famous brand, like a supermarket's own brand. Commercially prepared tinctures are usually in this range. I have personally chosen to use either 40% (which is 80% proof, i.e. 0.8 x 50%) or 37.5%. But if you have a cheaper and weaker Vodka, you can simply buy more of it.
Fresh Herbs vs Dried Herbs:
One can choose to use fresh herbs or dried herbs to make tinctures; and organic and non-organic herbs. Organic herbs tend to be more potent than their non-organic varieties and will not have pesticide or herbicide residues on them. Fresh herbs are in many ways preferable, but are harder to buy. They also require more preparation, i.e. chopping and possibly grinding in a mortar and pestle prior to addition to the tincture. The more finely chopped or ground the herbs are, the less space they will take up in the Vodka and the stronger you can potentially make your tincture. One could use a blender or manually chop the herbs.
A list of suppliers of dried organic herbs in the USA and UK can be found on the Links page. Fresh herbs can be purchased from your local (organic) growers or farmer's market. You may need to make a prior arrangement with a particular seller if they do not normally sell a particular item on their stall.
Most herb suppliers sell dried herbs, which have a longer shelf life and are lighter and easier to transport than fresh herbs, which must be used immediately. Clearly the same number of leaves will weigh more when fresh than when dried. Fresh herbs contain a large amount of moisture. When putting dried herbs into alcoholic solution, they take up less volume initially than fresh herbs and less weight of dried herbs will be required compared with fresh herbs, but dried herbs, because they are dry, will soak up some of the alcoholic solution to rehydrate them. If you make a tincture and you find that the level of solution drops below the level of the rehydrating herbs, then you have used either too many herbs or too little alcoholic solution - add more alcohol, measuring the additional amounts in a measuring jug, and adjusting the label with the new amounts/concentration calculations. Ideally you should have some excess vodka above the herbs to ensure proper ease of mixing, absorbance and straining.
When it comes to straining the herbs once the tincture is ready, please be aware that the volume of liquid from a tincture made with fresh herbs will probably be greater than the original volume of Vodka used, e.g. 1L Vodka may produce 1.2L of tincture. As the fresh herbs break down, the water content in the leaves is released into the Vodka. The reverse is true of dried herbs. As stated above, they absorb some of the water content of the Vodka, and some part of the tincture will remain in the sodden leaves when it is strained, so the actual end volume of tincture will always be less than the original volume of Vodka used.
Optimum Ratio of Alcohol Solution to Herbs:
It ultimately comes down to whether the herbs are in excess or the alcohol is in excess. There is an optimum ratio of herb to alcohol solution, too little herb and you are wasting alcohol, too much herb and you are wasting herb as the alcohol can only absorb so much. Herbs sticking out over the top of the vodka are not really having their active ingredients extracted efficiently if at all. Clearly to make the tincture as strong as possible the herbs should be in excess. Too much excess is however wasteful and won't make the tincture any stronger as such. Normally the amount of herb you can use is limited by volume. For example, with dried herbs, depending on how finely ground they are, one can only really use around 110-120g per litre of Vodka before the herbs start to poke out over the surface of the Vodka. With dried herbs, you really want to leave at least an inch or two of surplus liquid in the jar, or straining them because unmanageable. For fresh herbs, around 360g (of Coriander leaf) could be used per litre of Vodka. For this type of mixture, you would use at least a 1.5L container or larger, for example, a kilner jar or preserving jar with a rubber sealable lid. I found that 360g of fresh Coriander leaf and 1L of Vodka did not quite fit into a 1.5L kilner jar, but they may well fit with another type of herb). In general, the larger the container, the more weight of herb per volume alcohol you can put in - it makes a slight difference but not a HUGE difference.
Crushed seed powder in general tends to take up less space (weight for weight) in the Vodka than herb leaves do. However, it should be noted that although it is technically possible to make a 1:2 tincture with crushed seed powder, e.g. Milk Thistle seed powder, it is not practical, as the powder forms cement like paste at the bottom of the jar, which is very hard to stir (and does not dissolve despite vigorous shaking of the jar), and straining such a mixture would take a very long time and be a real nightmare! It is more practical to create a weaker tincture, closer to the strength used with dry herbs, despite the decrease in actual volume of dried herbal compound. For example, a 1:4 is the most one should entertain, and better still 1:6 (i.e. 100-200g of seed per litre of Vodka).
If one is using fresh herbs, one may want to consider whether the just use the leaves, or to include the stalks as well. If more of the active ingredient is found in the leaves, which is usually the case, then including stalks will merely mean less of the active ingredient is absorbed compared with other nutrients from the stalks. Some argue that dried herbs are stronger than fresh herbs on account of the fact that the leaves are often dried upside down, meaning any nutrients in the stalks should fall into the leaves. However, this shouldn't really make any difference as we are talking about the same moisture/nutrients if we include the stalks as well in fresh herbs.
If one is going to make a tincture of two different herbs, the herbs should be 'steeped' separately, and only mixed together at the final stage once the herbs have been removed. This is because of different absorption rates from the compounds in the different herbs, as one herb may saturate the Vodka faster than the other, essentially wasting the second herb. If you 'steep' them separately, then at least you know you have maximum strength of each separate herbal tincture before you mix them together.
It is also worth considering how long to leave the herbs for in the alcohol. Clearly the longer you leave it the better. However, most rapid absorption occurs at the beginning when there is zero concentration of the herb's active ingredients in the actual Vodka. As more compounds are drawn into the alcohol, the differential is less and so the rate of absorption is less. Eventually it reaches an equilibrium. So there is an optimum or most reasonable time to harvest the tincture, but if you are in rush, then it is best to leave it as long as possible, even up to a year. Herbs usually take a minimum of 3 weeks to 'steep' and sometimes up to 2 months. Crushed seeds and roots may take longer.
The other thing to consider is how efficient you are at squeezing all the tincture out of the soaked herbs once the tincture is ready. If you simply pour out the tincture, and have a jar full of sodden herbs, with plenty of Vodka containing the active herbal ingredients in it still in the mass of leaves, then it is a waste of Vodka and the tincture itself. There are various ways you can squeeze the 'juice' out of these herbs, prior to discarding them. One can use a funnel and muslin or coffee filter paper lining to pour the mixture back into the empty vodka bottle (to later pour into dropper bottles). After this one can take a glass bowl and use a sieve to spoon the sodden herbs into and squeeze them with a wooden spoon to squeeze more tincture out into the bowl, which afterwards can be poured back into the Vodka bottle with the rest of the tincture. One could place the wet herbs into a large piece of muslin, seal it up and squeeze it with one's hands over the glass bowl. One could also consider washing them, to rinse out this tincture 'juice', i.e. by pouring more Vodka or just plain water over the herbs, mix it around and pour this extra liquid in with the rest of the tincture. However, if you use alcohol, you are arguably spending more money here, and you could just as easily have put more alcohol into the jar at the start to have a more diluted tincture and potentially absorbed more from the herbs this way - and a larger liquid volume relative to herbs volume is easier to strain. If you do rinse the herbs with vodka or even with water, then the tincture that you do produce will be weaker than if you had just strained and pressed the sodden herbs to get as much tincture out as possible. However, you would then simply have a larger volume of slightly weaker tincture. But then you can just take a little more than normal. The above points are things to consider when buying herbs and Vodka, and the absolute amount of active herbal compounds you end up with in your final tincture at the end. The amount rather than the volume is probably more important, as you can always tailor how much you take. Food for thought anyway.
Definition of Tincture Strength:
The concentration of tinctures is generally expressed as a ratio. It is the ratio of ounces of herb to fluid ounces of Vodka. This is virtually the same as the number of grams of herb to the number of ml of Vodka. For example, a typical final tincture label might read 'Coriander Leaf Tincture (fresh herb) 1:3 @ 40% 5/4/07'. This label would mean that 1 ounce of fresh coriander leaf was used to very 3 fluid ounces of Vodka. The Vodka used was 40% volume (e.g. Absolut) and it was bottled on 5th April 2007 (if you don't live in the USA!) So in other words, for 1000ml of Vodka (i.e. a 1L bottle), one would need to buy 333g of fresh Coriander leaf. Clearly the ratio is based on the weight of the herb, whether fresh or dried, and as dried herbs weigh less than fresh herbs, the concentration ratio of a tincture made from fresh herb will be greater (e.g. 1:3 for fresh Coriander leaf) than that of a tincture made from dried herb (e.g. 1:8 or 1:10 for dried Coriander leaf), even if the same equivalent amount or number of leaves/plants was used in both cases. So it is important to know what the ratio actually refers to, fresh or dried herbs. In general, it is used to describe fresh herbs. To compare the strength of tinctures made from fresh and dried herbs, you may want to ask your supplier of organic dried herbs what the equivalent weight of fresh herbs would be (i.e. the weight of the herbs you purchased before they were dried).
e.g. 1L of vodka is 1000ml. Say we used 100g of dried organic Coriander leaf herbs. The ratio would be 1000/100 = 10, i.e. 1:10. If the Vodka was 40% Absolut, then the tincture would be labelled as 1:10 @ 40%.
Storage of Finished Tincture:
Dropper bottles should ideally be dark so as not to let too much light in, which will degrade the compounds in the tincture over time. It is important of course to label the jar where the herbs and Vodka are stored in, with the start date, concentration, volume of Vodka, weight of herb, type of herb etc. Similarly, the dropper bottles should be labelled too, with herb type, concentration and date of bottling (and perhaps the duration of steeping, e.g. 1 month).
It is worth noting that buying dropper bottles costs money, and if you have been using tinctures in the past before the point where you have decided to start making your own, on account of volumes required etc., then it is worth having kept all the empty dropper bottles from purchased tinctures when you have drunk them, as they can be reused for your own tinctures. The Vodka or other alcoholic beverage bottles used can also be used for storing larger amounts of tincture, prior to transferring the tincture to smaller dropper bottles for every day use.
It is best not to make too many tinctures in one go, as they will degrade/oxidise over time. Whilst the alcohol helps to stop microbial breakdown of the herbal extracts, it does not prevent oxidation. Some air will be in the dropper bottle and some will get into the bottle, even if the top is tightly screwed on. Tinctures do not last forever and manufacturers tend to label their tinctures bottles with up to a 3.5 - 4 year shelf life, based on being very tightly sealed at the time of bottling. It is best not to store the tincture in the kilner jars - i.e. leaving the herbs and Vodka in the kilner jar for a year or so until you actually need to use it - as the rubber seal is not going to be so airtight as a tightly screwed on smaller bottle top. Whilst tempting to keep a tincture in the kilner jar for longer with the herbs, the seal is inferior to that of a screw top bottle (much larger surface area, less pressure on the seal, and the seal in not encased in the lid like in a screw top bottle) and so the tincture/herbs will oxidise more if they are kept in the kilner jar for 12 months rather than being strained and bottled after a couple of months. After a few months or so you won't gain much from any more steeping/soaking.
Store your tincture in a cool, dark, dry place. If it is too warm, the oxidation process will be accelerated needlessly. Shop bought tinctures may sometimes be several years old when they are dispensed from the larger storage bottle and sold, so if you do buy them, check the preparation/expiry date.
Optional - Evaporating Off Alcohol Prior to Consumption:
When it comes to drinking tinctures, normally one measures the number of drops one wants (from the dropper bottle) into a cup or glass and then adds a little water and swallows it down. However, you do not have to consume all the alcohol in the amount of tincture you have served. You can evaporate off the alcohol by pouring freshly boiled water over it, into the mug, perhaps half a mug full or a whole mug full of boiling water. One then leaves the mug to stand for maybe 10 minutes allowing most of the alcohol to evaporate. This may break down some of the beneficial compounds in the tincture however. Clearly, the greater the volume of tincture in your cup, then the more boiling water you need to add to it, to ensure the subsequent mixture reaches a hot enough temperature to evaporate most of the alcohol off. You are no doubt familiar with this principle from physics (in terms of relative volumes and temperatures) and from adding piping hot water to your bath when it starts to cool down. If you are using considerable quantities of tincture in each dose, e.g. 1-2 tablespoons, then a filling the mug up with boiling water will only result in a hot mug of diluted tincture rather than a very hot one. If it is not hot enough, not enough of the alcohol will evaporate off, resulting in a rather boozy drink. If you are drinking the tincture three times a day, this is probably a bad idea!
If one is to consume large amounts of a herbal tincture, one should firstly ask oneself why one is consuming such large amounts as it may affect the body's energetic balance (c/f TCM and the hot/cold or dry/damp qualities of the herbs) in the first place. However, if one is going to do so, then the alcohol content will become a major issue. One can prepare the tincture in the above manner, with boiling water, but the amount of boiling hot water required becomes excessively large, and you may want to consider actually leaving the mug (with tincture/hot water mixture) in a pot of freshly boiled water (i.e. a water bath for chemistry buffs), making sure of course that the water level in the pan does not spill over into the mug. After leaving the mug in there for 10-20 minutes, you can remove it and leave it to cool or stand it in a similar pot of cold water, for a few minutes, if you intend to drink it immediately. To ensure more alcohol evaporates, you can actually keep the water in the pan close to boiling point, either by placing one corner of the pan on the heat, leaving the mug of tincture solution in the other corner of the pan, so it is not directly in contact with the heated part of the pan. The hot water in the pan should therefore only bubble in one corner of the pan. If you do this, make sure the handle of the pan is not directly over the hot plate, or you may end up burning yourself. One could always place the entire pan on the hot plate, but on a very low heat. However, this means that the mug is in direct contact with a heated part of the pan base, which is not ideal. Too high a heat and the mug may start to rattle as bubbles form underneath it.
The other way to do it is to place the actual tincture dropper bottle without the drop stopper in the end in a pan of boiled or very hot water, and allow the alcohol to evaporate that way. However, keeping the alcoholic tincture as is in the dropper bottle is probably more sensible as the alcohol acts as a preservative (being a poison!) - and you can evaporate off the alcohol from your small serving as and when required.
If you are feeling particularly fancy, you may choose to buy a retort stand and clamp, and a suitable sized pyrex or borosilicate type flask, so you can hold the flask full of tincture in a pot of boiling water, without touching the sides of the pan, i.e. a water bath. This is not that expensive to set up yourself in your kitchen.
If you have a pyrex or ceramic glass pot, you could always boiling the tincture/water mixture in a pot for a few minutes, then pour it into a mug, maybe adding a little water to the pot to wash out any remaining tincture and add this to the diluted tincture liquid in the mug. However, the high temperature of the surface of the pot may degrade the compounds in the tincture - and in the case of chelating herbs, may cause the herbs to bind with the pan e.g. a ceramic pan (which contains Aluminium in the ceramic). If you do use a pot to heat the herbs with, do so on a very low heat. As a general rule it is best to avoid any metallic objects getting in contact with the tincture during straining, pouring or otherwise, especially cilantro.
Basically, the closer you can get the temperature of the tincture to 100C, the more effectively and quickly you will get rid of the alcohol. You can probably come up with other ideas of your own - the main thing is convenience and not losing any tincture, not having to drink ridiculous volumes of liquid and not drinking too much alcohol. You may wish to do this each time you drink the tincture, or to heat a day's worth of tincture in one go.
Use of Glycerine instead of Alcohol:
An alternative is to make tinctures using Glycerine (a.k.a. Glycerin or Glycerol) instead of alcohol solutions. Glycerine is a sugar alcohol and is 60% as sweet as sugar. It is often used as a filler in sweet food products such as biscuits. It tends to be thicker than alcohol and is extremely sweet in comparison. It also does not burn the liver or have any intoxicating effects like Vodka (the effects are normally minimal based on normal tincture dosages). It may also be somewhat cheaper to buy than Vodka or grain alcohol. Glycerine tends to extract essential oils from herbs much better than alcohol, but its capacity to extract resins and gums are somewhat low when compared to alcohol.
Glycerine is however higher in calories than the equivalent volume of Vodka.
Glycerine may also contribute to bloating (gas), diarrhea or heartburn if consumed in significant quantities (as it is consumed by good and bad bacteria in the intestines, the bad bacteria producing the gas).
Unlike an alcoholic tincture, if you warm the tincture containing Glycerine, the Glycerine will not evaporate off.
I have also found that it does not readily mix with powdered seeds unlike Vodka (etc.), with the powder at the bottom and the Glycerine just resting on top and not soaking into it as would water or an alcoholic solution. Straining the milk thistle seed sludge from the glycerine was virtually impossible, using a variety of filter papers or sieves as it did not pass through the filter paper at all. It might be easier with leaves or larger particles.
Glycerine does not mix at all with water in my experience. The Glycerine forms a layer on top of the water and even if you shake the mixture vigorously so it mixes completely, it separates out again. I have read that 50%-67% glycerine is normally used in Glycerine-based tincture making, the rest made up with water. Filtering such a mixture is very difficult but slightly easier than a pure Glycerine-based tincture mixture which whilst being homogenous (a plus) is much thicker in consistency. The only reason that it is easier to filter in my experience is because the watery later filters out more readily.
Alcohol/alcoholic solutions tends to be the main tincture solvent of choice, and used in conjunction with tinctures such as Cilantro (Coriander Leaf) and Milk Thistle.
www.naturalherbalism.com/Alcohol-Based/How_To_Prepare_Glycerine_Tincture.html
www.newhope.com/nutritionsciencenews/NSN_backs/Apr_99/backtalk.cfm
Recipe:
Below is the tincture recipe from Mountain Rose Herbs in the USA. Thank you Mountain Rose Herbs for providing this information. My comments are inserted in square brackets. I have inserted my own pictures below.
This recipe is the simplest way to make your own liquid herbal extracts in your own home.
1. Start with a clean jar that has a tight fitting lid [i.e. a Kilner Jar of 1.5 or 3 Litres volume] and the herbs of your choice. If you can use fresh herbs, then fabulous! Fresh material is always preferred but availability is determined by your local bioregion, climate, etc and many quality herbs may not be available. If you cannot locate fresh materials, be sure to get good quality, [dried] organic herbs from a reputable supplier. Note: Try not to use powdered herbs; they will be difficult to filter out in the end and the debris will settle in your final product.
2. Chop the herbs finely - a blender or coffee grinder works well [depends on the herb and how it comes, dried herbs are usually already finely chopped. Fresh herbs usually are simply chopped off plants and require processing]. Then place the materials in the glass jar with a tight fitting lid, such as a canning jar.
[The picture below shows a jar with dried herbs in it.]

3. Pour a good and strong grain alcohol, [gin] or vodka over the herbs. Completely cover the herbal material, and leave 2-3 inches of alcohol above the herbs [not necessary with fresh herbs with fully hydrated leaves]. 100 proof alcohol is recommended, but you can also use grain alcohol. When using grain alcohol, mix it with equal parts of purified water to create 50% alcohol to 50% water ratio. If you wish to avoid alcohol, then vegetable glycerin or vinegar (optionally mixed with water) may be used, although not recommended. Although glycerin and vinegar are not as effective or strong as alcohol, they do create milder extracts that are suitable for children or those sensitive to alcohol. If using dried herbs you will need to add more alcohol over the next day or two as the dried herbs absorb and expand. A good ratio for dried material is about 1 part herb to 5 parts alcohol, and with fresh material 1 part herb to 3 parts alcohol.
[Clearly it depends on the exact herb - however, the more finely chopped and ground the herb is, the less volume it will take up in the saturated mixture. This is why chopping/blending of the herbs prior to use is highly recommended. However, blending herbs is more effective in a liquid medium, and you may choose to wait until this stage once you've added the Vodka to the herbs in the jar, to actually finely blend the mixture in a Juicer to a finely chopped consistency, but not a paste, and then pour the mixture from the blender/juicer back into the kilner jar.]
4. Cover with a tight fitting lid, shake well.
[The image below shows a preparation using fresh Coriander leaf, purchased from local supermarket. These herbs are used to demonstrate all the steps of the tincture making process in this recipe.]

[The image below shows a preparation using dried organic Coriander leaf (not shown elsewhere in this recipe). This can be compared to the appearance of fresh herbs in Vodka above.]

5. [Place a label on the jar describing it's contents, weight of herbs and type, volume and type of alcohol, date of preparation, etc.]

6. Place the jar in a dark place. Allow the mixture to soak and macerate for 4 to 6 weeks. Shake every few days to help the alcohol extract the active constituents from the herbs.
[The image below shows the same preparation as above made from fresh Coriander leaf, after 6 weeks in a dark airing cupboard, being shaken every day or every other day. Notice how the leaves have broken down.]

7. After 4 to 6 weeks strain the herbs. Use a large strainer lined with fine mesh cloth or cheesecloth. Make sure to tightly squeeze the material to extract every precious drop from the cloth. Funnel the material from your
larger container into smaller bottles, preferably amber bottles and store your tinctures in a cool dark place. Your herbal tinctures will stay good for at least 3-5 years, if not indefinitely.
[Getting ready to strain the herbs]

[Straining the herbs using a plastic strainer/sieve. It is not generally necessary to use a muslingauze, mesh cloth or filter paper if the leaves can be trapped in a sieve. However, there are many ways of achieving a similar result. If you are straining the herbs into a glass bowl, then do not fill the bowl up too high, as it becomes very difficult to pour it from the bowl to the bottle without spilling large amounts]

[Pouring the strained tincture from the bowl into the bottle(s), in stages, using a large funnel. Be sure to pour the tincture from the bowl quickly into the funnel, and not mess around or be too careful, as the slower you pour it the more likely it will pour down the sides of the bowl and waste large amounts of tincture. Be bold!]

[Get all the leaves out of the storage jar and into the sieve with a spoon or similar implement]

[Squeeze/crush/press the leaves firmly in the strainer/sieve until you have squeezed as much tincture out of them into the bowl as possible, and pour this tincture into the original Vodka bottle(s) using the funnel. You can of course elect to pour the tincture straight into your dropper bottles, but this is potentially wasteful, as a very small funnel is required for dropper bottles and the chances of spilling much of your tincture is very high. Vodka bottles are designed for easy pouring of small amounts of liquid, and I prefer to first pour the Vodka from the bowl into the original Vodka bottle, and from there pour it into the dropper bottles using a mini-funnel.]

[The result in shown below. As fresh herbs were used in this example, the actual liquid volume was greater than at the start. 1L of 40 Vodka plus 360g of fresh Coriander leaves produced 1.2L of tincture. This is on account of the water content of the leaves which was released as the herbs were broken down during the steeping process. With dry herbs, it will clearly be the opposite, that you will get less volume of tincture from the same volume of alcoholic solution at the start]
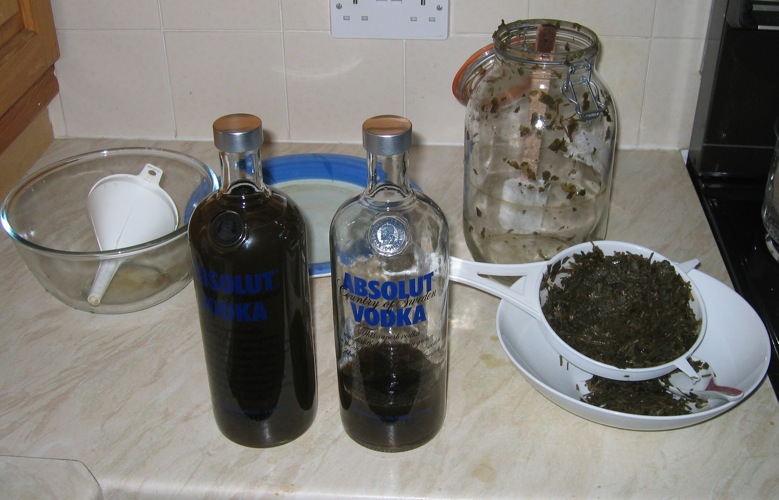

[You may wish to pour the strained tincture through a fine filter paper. There are generally not large particle sizes in such a tincture, and the resulting tincture is usually a little cloudy. Most pre-purchased tinctures use sophisticated filtration set ups. However, a cloudy tincture is of no consequence. Be aware that the filter will clog up after a few hundred millilitres and need changing. Filtration of 1L may for example take 20 minutes. You may not wish to bother with this, it is optional.]


[Once you have finished, label the bottle with the relevant information]
[Now transfer the tincture from the Vodka bottle into tinted/darkened dropper bottles using a mini-funnel.]

[Once they are full, put the dropper plug back in and screw the cap on. Label the dropper bottles. The dropper bottles can be left out in daylight, but any tincture in a clear and colourless bottle like a Vodka bottle should be stored in the dark, away from natural or artificial light, to stop the tincture degrading. Simply keep the larger bottles in the cupboard when not in use.]

back to top
9. Sprouting:
It is easy to sprout your own beans or seeds. Please see a list of those legumes that are safe to eat raw on the Digestion page.
All you need to start sprouting is to buy some, preferably organic, seeds or dried beans. Some seeds require soil to grow in, but the recipe here is only for those that can be sprouted in a jar. Alfalfa seeds are highly convenient in this respect. The more confident you become in making your own sprouts, the greater number of things you might want to try. You might even want to grow your own broccoli sprouts or wheat grass from a growing tray. Below is the procedure to making alfalfa sprouts.

1. Take a clean jar with a screw top mesh lid (i.e. a sprouting jar), and put a half a tablespoon of so of alfalfa seed into the bottom.

2. You must now soak the seeds overnight or for 24 hours. Fill up the sprouting jar half way or so with filtered water. Slosh the water around to make sure all seeds are covered in water and aren't floating on the top, half dry. Leave overnight. You may elect to store it in a dark cupboard, which is probably better, but it is not strictly necessary. If you do, don't forget about it!

3. Pour away the water in the jar, with the mesh lid still in place.
4. Rinse out the soaked seeds in the jar a few times with filtered water, keeping the lid in place, emptying the water from the jar each time. Leave for 24 hours. You may prefer again to leave the sprouts in the dark.
5. Inspect the seeds. They may take up to a week to fully sprout and grow. You don't want them to grow too much (i.e. fleshy green leaves). The sprouted stage is when they are at their most nutritious. If they have not sprouted and grown enough, repeat step 4 and wait another 24 hours. Then repeat step 5 again. If kept in the dark, the leaves will not turn green, and this may be a good thing as less of the nutrients from the seeds are consumed by the young shoots. Either way, they are still nutritious. If you do keep them in the dark, e.g. in a cupboard, be sure to leave a note out or other visual reminder that they are in there, to rinse them in case you forget about them! If the sprouts start to smell 'funny' and the water is a little milky when you rinse them out, then it is likely that you have left them too long and that mould has started to grow inside the jar. If this happens, then discard the sprouts.

6. When they are ready, they can be stored in a refrigerator, where the cool temperature will mean that they stop growing. When being stored in this way, it is good practice to rinse them every few days and also before consumption. When you want to serve some up, give the sprouted alfalfa a quick rinse, shake out as much of the water as possible, then remove the screw top lid, and use a fork to lift out as much as is required and place it directly onto your plate. Best eaten raw/fresh. If you have put too many seeds in the jar at the start, then the alfalfa may become very dense and may require 'muscle' to fork it out of the jar! Try to find the right balance and the optimum amount with each consecutive batch.

7. When you have finished all the sprouts in the jar, give the jar and good wash and clean, ready for its next use. You may find it ideal if you like to eat sprouts regularly to have two sprouting jars, starting the second batch when the first batch has been sprouting for a few days. In this manner, when you've finished eating one jar, the next will be ready. Find your own rhythm that suits you.
Enjoy your sprouting and a source of fresh, cheap sprouted seeds!
back to top
back to home